
Alwrity's AI Blog Content Writer
- lekhakAI
- Jun 9, 2024
- 3 min read
Updated: Feb 14
How to Use Alwrity's AI Blog Writer
Alwrity's Blog Writer is your ultimate tool for creating high-quality, engaging, and informative blog posts. Whether you are a seasoned content creator or just starting, our tool simplifies the process with its powerful features and intuitive interface.
Alwrity's AI blog writer does google search for given keywords and reads first 10 results to provide context for blog content generation. The generated blog content is factual on latest SERP results. Some feature to lure you in:
Blog Content Personalization Options
Content Personalization: Customize the content to fit your brand and target audience. Tailor your messages to resonate more effectively.
Images Personalization: Modify and personalize images for your blog to enhance visual appeal.
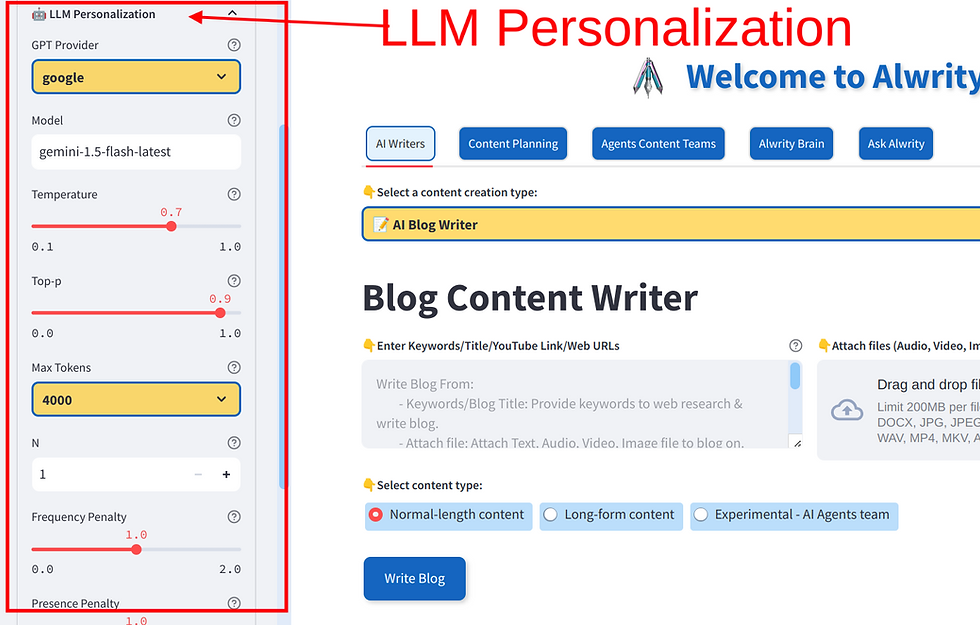
LLM Personalization: Fine-tune the language model according to your specific requirements for more accurate and relevant content generation.
Search Engine Personalization: Optimize your content for search engines to improve visibility and reach.

Modify Prompts
Easily modify and manage content prompts. This feature allows you to adapt and refine your content strategy dynamically.
Versatile Input Options
Text Input: Enter keywords, blog titles, YouTube links, or web URLs to guide content creation.
File Uploads: Attach files directly into the content generation process. Supported file types include text (TXT, PDF, DOCX), images (JPG, JPEG, PNG), audio (MP3, WAV), and video (MP4, MKV, AVI, MPEG4).

Content Types
Normal-length content: Ideal for standard blog posts (word length - 2000-3000)
Long form content: For detailed and in-depth blogs, articles or guides (word length- 3000 - 4000).
Experimental - AI Agents team: Utilize advanced AI agents team for innovative and creative content generation. The AI Agents team collaborate for web research, outline and creating content.
Our AI Blog Content Writer tool helps you create engaging and informative blog posts with ease. Follow the steps below to use our tool effectively:
Step 1: Content Personalization
On the left sidebar, you will find various personalization options. Click on any of the following to expand and customize your content:
Content Personalization: Tailor the content to fit your brand and audience.
Images Personalization: Customize images for your blog.
LLM Personalization: Fine-tune the language model for your specific needs.
Search Engine Personalization: Optimize your content for search engines.
Step 2: Modify Prompts
You can modify prompts by navigating to the "Modify Prompts" section in the sidebar. Currently, no prompts are found, but this area will be populated once you start creating content.
Step 3: Select a Main Function
At the top of the main screen, you will see a set of blue tabs. Click on the "AI Writers" tab to access the Blog Content Writer.
Step 4: Blog Content Writer Interface
After selecting the "AI Writers" tab, choose "AI Blog Writer" from the content creation type options.
Step 5: Enter Keywords/Title/YouTube Link/Web URLs
In the text area provided, you can either enter the keywords, blog title, YouTube link, or web URLs related to the content you want to create. Here are a few tips:
Keywords/Blog Title: Provide relevant keywords or a catchy title to guide the content generation.
Attach File: You can attach text, audio, video, or image files that you want to include or reference in your blog.
YouTube Link: If you have a YouTube video link, provide it here to convert the video content into a blog post.
Step 6: Attach Files (Optional)
On the right side of the text area, you will find an option to attach files. Click "Browse files" to upload any audio, video, image, or document files. Supported file types include:
Text Files: TXT, PDF, DOCX
Image Files: JPG, JPEG, PNG
Audio Files: MP3, WAV
Video Files: MP4, MKV, AVI, MPEG4
Step 7: Select Content Type
Below the text area, choose the type of content you want to generate:
Normal-length content: Ideal for standard blog posts.
Long-form content: For in-depth articles or detailed guides.
Experimental - AI Agents team: Leverage our AI agents to create innovative content.
Step 8: Write Blog
After entering all the necessary information and uploading any required files, click the "Write Blog" button. The tool will process your input and generate a blog post based on the provided details.
Tips for Best Results
Detailed Keywords: The more detailed and specific your keywords, the better the quality of the generated content.
Multiple Inputs: You can combine keywords, URLs, and attached files to enrich your content.
Review and Edit: Always review the generated content to ensure it meets your standards and make any necessary edits.
By following these steps, you can effectively use Alwrity's Blog Content Writer to create high-quality blog posts tailored to your needs. Happy blogging!
Comments